This is our final article in our 3-part series on garbage disposals.
In our first article, we provided some great tips on garbage disposal maintenance and best practices to help you keep your current disposal working properly. But, like any home appliance, garbage disposals stop working. So, in our second article in this series, we provided ideas on selecting a new garbage disposal that best fits your needs. This final article is for you ‘do-it-yourselfers’ who have the energy and inclination to install your new disposal in your free time.
Let’s be honest, installing a garbage disposal isn’t exactly the easiest task in the world. This is because doing the job properly requires some electrical and plumbing wiring skills. You must also make sure that you have a dedicated 20 amp 120V outlet that is close to where the unit will be installed.
Installing the Mounting Ring and Sink Flange
Before you begin, you must either remove the fuse or turn off the circuit breaker that feeds power to the disposal. Next, you will have to install the assembly that will hold the garbage disposal in place. You will need help from a second party to do this part properly.
The assembly is made up of a mounting ring and a sink flange. It must be fastened on either side of the opening in the sink. The steps are as follows:
- Seal the opening of the sink with plumber’s putty that is about half an inch thick
- Place the sink flange into the opening and onto the plumber’s putty
- Have someone hold the sink flange in place as you go under the sink and slide the triangular attachment ring and the fibrous gasket onto it.
- Firmly attach the mounting ring by tightening its three mounting screws evenly.
Connecting the Power Cord of the Garbage Disposal
Now that the assembly is in place, you must now attach the power cord to the disposal. The process is as follows:
- Remove the electrical plate that is on the bottom of the garbage disposal
- Use wire nuts to connect the white wire that’s on the disposal to the white wire that is on the power cord. The same must be done for the black wire and green ground wire.
- Once this is completed, put the connected wires in the electrical box and put the cover plate back on
Installing the Garbage Disposal
Before you continue, it is important to note that, the disposal may be a little heavy so it’s essential that you take your time while doing this part of the project:
- Match the disposal up to the three mounting ears that are on the sink mounting assembly
- Hold the disposal in place and turn the lower mounting ring until all of the mounting ears are secured
Connecting the Drain Lines
Now that the garbage disposal is in place, you must connect the drain lines. The process is as follows:
- Attach the discharge tube to the garbage disposal with the appropriate gasket and screws
- Position the garbage disposal so that the waste trap and the discharge tube are properly aligned
Finishing Touches
It is now time to must lock the garbage disposal into place. This is achieved by using a screwdriver to tighten the rotating cam collar that is on the unit.
After this is completed, you must check the installation for leaks and tighten any loose drain connections. Once this is over, turn the circuit breaker that sends power to the unit back on and make sure that it’s functioning properly. That’s it. Your job is done.
Grant it, this do-it-yourself project is not for everyone. If you need a new garbage disposal, don’t hesitate to give us a call. We can make your life a lot simpler.
 Which appliance do you have in your kitchen that can make your life not only easier but more environmentally friendly as well? If you guessed the garbage disposal, you are right on the money.
About Garbage Disposals
Garbage disposals were invented in the late 1920s by John Hammes, an architect in Wisconsin. And just incase you weren’t aware, they are installed under your kitchen sink – their job is to take solid food waste and demolish it using rotating knife blades. In this way, the solid food is broken down and can be disposed easily through your plumbing system.
Types of Garbage Disposals
There are two basic types of garbage disposals. They are:
- Continuous Feed: These are the most common type of garbage disposals and they are also the easiest to use. They have an open mouth and are operated by an on and off switch that is mounted on a wall, similarly to a light switch.
- Batch Feed: To operate this model, you have to put the waste food into a hopper (grinding) chamber and top it with a stopper lid. This activates a grinder which pulverizes the food. This type is more expensive than its counterpart but it’s considered to be a safer option.
Garbage disposals also come in a variety of motor sizes that include 1 HP, ¾ HP, ½ HP, and 1/3 HP. 1/2 and 1/3 HP model types are perfect for soft foods but, due to their limited power, these models also come with smaller grinding chambers. That is to say, they are not able to handle large amounts of waste food in an efficient manner.
If you want smoother operation, fewer jams, and finer pulverization, the ¾ HP and 1 HP models are best. They cost a little more but they have larger grinding chambers and can handle higher volumes of waste food. They will also place less stress on your plumbing system.
Garbage Disposal Recommendations
When it’s time to buy a garbage disposal, there are many options available, especially because the newer models have updated features. For instance, the InSinkErator brand has a new model called the “Evolution Excel” that comes with an auto-reversing grind function. Other popular disposers include:
- Whirlaway Model 291 with ½ HP
- Waste King L-1001 Legend Food Waste Disposer with ½ HP
- InSinkErator Evolution Septic Assist Disposer with ¾ HP
- InSinkErator Evolution Essential Food Waste Disposer with ¾ HP
- Waste King L-8000 Legend Series with 1 HP
Additional Considerations
- Disposals with food chambers made out of glass filled nylon or stainless steel are rust resistant and easier to clean
- All disposals are a little noisy but those with insulated grinding chambers and a higher HP are less jarring on the ears
Buying a new garbage disposal is an important investment and shouldn’t be taken lightly. The information listed above will give you an idea of what’s available and will help you narrow down your choices so that you can make a decision that benefits you. Happy Shopping!
…Watch for our next article on Garbage Disposal Installation
 Has your garbage disposal been acting up lately? Before you spend money calling us, check out the following tips and tricks to help you fix, or prevent, common issues that we find most commonly plague owners of this very important home appliance.
But, don’t hesitate to call us if you have any problems. Your safety is our priority.
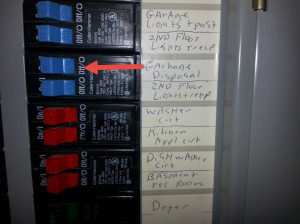
Before we get started, it is important to note that, under no circumstances should you put your hand in the disposal. If you do, please first turn off the electricity to your garbage disposal via your electric circuit box (shown above). If you can’t do this, call us. You need professional service. Safety is key!
What To Do if Your Garbage Disposal Won’t Turn On
There are several reasons why your garbage disposal won’t come on but, there’s a good chance it’s not a major malfunction. Just follow these steps:
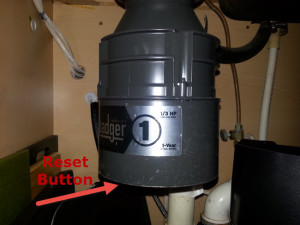
- Reset your garbage disposal. Garbage disposals have a reset button. It’s located on the bottom of your appliance and is red. Push in this reset button to get it working again.
- If this step doesn’t work, check the circuit breaker to see if it has tripped and, if so, push the lever back into the on position on your electric circuit box.
If you hear a humming sound, there is some hope. The humming indicates that your unit wants to work, but the blades might be stuck. Some object might be keeping your blade motor from turning. You can try dislodging this object so that the motor assembly is freed and turns freely. Your garbage disposal blades are fine, but you’re blade motor needs to turn freely so your garbage disposal blades can do their job. It might be a small piece of bone or similar very small object.
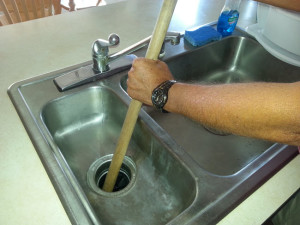
 You might try unsticking your blade motor. It’s easy and this works. Do you have a plunger in your house or an old broom handle? You need a piece of wood about this size in length and diameter. If you have a plunger with a wooden stick attached, this is perfect. Unscrew the stick from the rubber part of the plunger. Ensure that you have all power to your disposal turned off to ensure your safety. Just flip your circuit breaker switch to the off position. Apply hard pressure against one of you garbage disposal blades. Most garbage disposals have three blades. Push it until it moves.
This will dislodge the object that is preventing the motor from turning. Turn your electricity back on, hit your red reset button again, and you should be good to go. If not, repeat this procedure. Apply more pressure against your blades. You should feel the motor actually move. If this doesn’t work, you’re probably not applying direct pressure on your blades. Grab a flashlight and find your three blades. This will help you find your target and get the job done.
If none of these options get your garbage disposal working again, then the issue might lie with the fault switch of the disposal itself. If this is the case, you won’t hear any humming sound assuming you’ve pressed the red reset button under your garbage disposal. To fix this, follow these steps:
- Find the garbage disposal’s power switch. It is usually located either under the sink or on the wall next to the unit
- Go to the circuit breaker and cut off the power to the disposal
- Replace the switch that powers the disposal
- Go to the circuit breaker and turn the power back on.
Check to make sure that the disposal works. If not, you should call us. It is also important to note that, if you are unable to turn your disposal on and you cannot detect a humming sound coming from the unit, this means that it is probably beyond repair and will need to be replaced.
Quick Tips on Garbage Disposal Preventive Maintenance
Garbage disposals help make our lives easier, but it’s important that we take care of these appliances to keep them running at their best. The following usage tips will help you do a bit of preventative maintenance so that you can avoid some of the common problems that plague these units:
- Keep potato peels, eggshells, and coffee grounds out of your disposal. When these materials are pulverized, they create a paste that will accumulate and clog your drain.
- Grind up ice cubes and lemon peels in your disposal, about once or twice a month to keep it maintained.
- Pour a half-cup of vinegar and a couple of handfuls of baking soda down the disposal every month. It’s important to note that, when doing this, you must not turn the unit on. Let the mixture sit in the hopper until its finished foaming. Once this has occurred, rinse the mixture down the drain.


