This is our final article in our 3-part series on garbage disposals.
In our first article, we provided some great tips on garbage disposal maintenance and best practices to help you keep your current disposal working properly. But, like any home appliance, garbage disposals stop working. So, in our second article in this series, we provided ideas on selecting a new garbage disposal that best fits your needs. This final article is for you ‘do-it-yourselfers’ who have the energy and inclination to install your new disposal in your free time.
Let’s be honest, installing a garbage disposal isn’t exactly the easiest task in the world. This is because doing the job properly requires some electrical and plumbing wiring skills. You must also make sure that you have a dedicated 20 amp 120V outlet that is close to where the unit will be installed.
Installing the Mounting Ring and Sink Flange
Before you begin, you must either remove the fuse or turn off the circuit breaker that feeds power to the disposal. Next, you will have to install the assembly that will hold the garbage disposal in place. You will need help from a second party to do this part properly.
The assembly is made up of a mounting ring and a sink flange. It must be fastened on either side of the opening in the sink. The steps are as follows:
- Seal the opening of the sink with plumber’s putty that is about half an inch thick
- Place the sink flange into the opening and onto the plumber’s putty
- Have someone hold the sink flange in place as you go under the sink and slide the triangular attachment ring and the fibrous gasket onto it.
- Firmly attach the mounting ring by tightening its three mounting screws evenly.
Connecting the Power Cord of the Garbage Disposal
Now that the assembly is in place, you must now attach the power cord to the disposal. The process is as follows:
- Remove the electrical plate that is on the bottom of the garbage disposal
- Use wire nuts to connect the white wire that’s on the disposal to the white wire that is on the power cord. The same must be done for the black wire and green ground wire.
- Once this is completed, put the connected wires in the electrical box and put the cover plate back on
Installing the Garbage Disposal
Before you continue, it is important to note that, the disposal may be a little heavy so it’s essential that you take your time while doing this part of the project:
- Match the disposal up to the three mounting ears that are on the sink mounting assembly
- Hold the disposal in place and turn the lower mounting ring until all of the mounting ears are secured
Connecting the Drain Lines
Now that the garbage disposal is in place, you must connect the drain lines. The process is as follows:
- Attach the discharge tube to the garbage disposal with the appropriate gasket and screws
- Position the garbage disposal so that the waste trap and the discharge tube are properly aligned
Finishing Touches
It is now time to must lock the garbage disposal into place. This is achieved by using a screwdriver to tighten the rotating cam collar that is on the unit.
After this is completed, you must check the installation for leaks and tighten any loose drain connections. Once this is over, turn the circuit breaker that sends power to the unit back on and make sure that it’s functioning properly. That’s it. Your job is done.
Grant it, this do-it-yourself project is not for everyone. If you need a new garbage disposal, don’t hesitate to give us a call. We can make your life a lot simpler.
Great customers are taking the time to actually send us emails praising our service. These are customers that make an extra effort and take time out of their busy schedules to write us a personal email thanking us for our professionalism.
Here’s one from Patrick in early July:
“My name is Patrick and I just had to let the supervisor of Ms. Heather know that she was very, very, very professional and kind!!!… when she came to fix my air conditioner unit on July 9 in Clinton, MD. Keep up the Excellent work Ms. Heather. YOU GO GIRLLLLLLL.”
Check out this email we received from Demetrice in Upper Marlboro on July 21:
“I am reaching out to you to inform you that the HVAC service I received on Saturday from Heather was wonderful. From the beginning to the end she showed impeccable ability and professionalism. She quickly assessed our problem and got to work restoring our Air Conditioning to our home. My husband and I were very pleased.
Thank you for the wonderful experience; and if we need our unit serviced again in the future, we know exactly whom to call.”
Marvin in Upper Marlboro also took the time from his busy schedule to send us this awesome email review in late July praising our service:
“I am writing to recognize your HVAC technician Heather for her hard work and diligence in resolving my problem with my HVAC system. After making arrangements with my warranty company to initiate service with your company, Heather was called in to make it her number one priority to solve our problems. She listened when I knew I wasn’t making any sense explaining my problems. She was patient and actually tried different configurations with the system when previous technicians basically looked at it, and said there was nothing they could do.
My family thanks her for her outstanding service and to you for hiring her to represent your company.”
This great email review was received from Dave and Nancy in Leonardtown, MD on 5 August:
“Good morning Stephanie (our super customer service rep). All is well at the moment! Just to let you know that the new Pump-Motor & Holding Tank and associated plumbing installed on 23 July has been working fine and keep up with water demands since we had the new 20 Amp circuit breaker installed on 30 July. The breaker is no longer tripping. We sincerely appreciate everything Jerry’s Plumbing and Heating has done to help us out with this problem. Your Senior Technician, Doug, did and absolutely outstanding job throughout the entire and check-out the pump system. He stood by us all the way until the system was working properly. We will call on your technical assistance for our future plumbing problems. And, we will highly recommend Jerry’s to our neighbors and friends.
Appreciate all your help with this problem.”
Here’s another fantastic review from Bobby C in Waldorf, MD.
“Good morning. I like to express my extreme pleasure with the service I received from Heather. Her professionalism, enthusiasm and love for her job was unlike anyone I have ever seen. Totally impressed! I will definitely recommend Heather/Jerrys to all my family and friends should they require your services. She should be promoted!!!
Warm Regards,
Bobbie”
Our management team recognizes the accomplishment of all our techs, but there is no better recognition then those received from our satisfied customers praising our service. And, for that we thank all our customers!
 Which appliance do you have in your kitchen that can make your life not only easier but more environmentally friendly as well? If you guessed the garbage disposal, you are right on the money.
About Garbage Disposals
Garbage disposals were invented in the late 1920s by John Hammes, an architect in Wisconsin. And just incase you weren’t aware, they are installed under your kitchen sink – their job is to take solid food waste and demolish it using rotating knife blades. In this way, the solid food is broken down and can be disposed easily through your plumbing system.
Types of Garbage Disposals
There are two basic types of garbage disposals. They are:
- Continuous Feed: These are the most common type of garbage disposals and they are also the easiest to use. They have an open mouth and are operated by an on and off switch that is mounted on a wall, similarly to a light switch.
- Batch Feed: To operate this model, you have to put the waste food into a hopper (grinding) chamber and top it with a stopper lid. This activates a grinder which pulverizes the food. This type is more expensive than its counterpart but it’s considered to be a safer option.
Garbage disposals also come in a variety of motor sizes that include 1 HP, ¾ HP, ½ HP, and 1/3 HP. 1/2 and 1/3 HP model types are perfect for soft foods but, due to their limited power, these models also come with smaller grinding chambers. That is to say, they are not able to handle large amounts of waste food in an efficient manner.
If you want smoother operation, fewer jams, and finer pulverization, the ¾ HP and 1 HP models are best. They cost a little more but they have larger grinding chambers and can handle higher volumes of waste food. They will also place less stress on your plumbing system.
Garbage Disposal Recommendations
When it’s time to buy a garbage disposal, there are many options available, especially because the newer models have updated features. For instance, the InSinkErator brand has a new model called the “Evolution Excel” that comes with an auto-reversing grind function. Other popular disposers include:
- Whirlaway Model 291 with ½ HP
- Waste King L-1001 Legend Food Waste Disposer with ½ HP
- InSinkErator Evolution Septic Assist Disposer with ¾ HP
- InSinkErator Evolution Essential Food Waste Disposer with ¾ HP
- Waste King L-8000 Legend Series with 1 HP
Additional Considerations
- Disposals with food chambers made out of glass filled nylon or stainless steel are rust resistant and easier to clean
- All disposals are a little noisy but those with insulated grinding chambers and a higher HP are less jarring on the ears
Buying a new garbage disposal is an important investment and shouldn’t be taken lightly. The information listed above will give you an idea of what’s available and will help you narrow down your choices so that you can make a decision that benefits you. Happy Shopping!
…Watch for our next article on Garbage Disposal Installation
 Has your garbage disposal been acting up lately? Before you spend money calling us, check out the following tips and tricks to help you fix, or prevent, common issues that we find most commonly plague owners of this very important home appliance.
But, don’t hesitate to call us if you have any problems. Your safety is our priority.
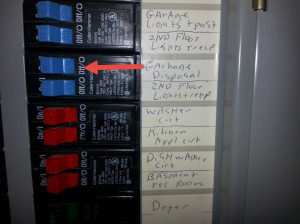
Before we get started, it is important to note that, under no circumstances should you put your hand in the disposal. If you do, please first turn off the electricity to your garbage disposal via your electric circuit box (shown above). If you can’t do this, call us. You need professional service. Safety is key!
What To Do if Your Garbage Disposal Won’t Turn On
There are several reasons why your garbage disposal won’t come on but, there’s a good chance it’s not a major malfunction. Just follow these steps:
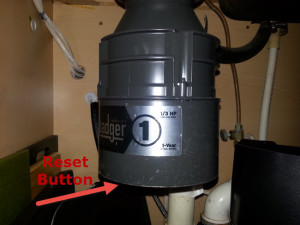
- Reset your garbage disposal. Garbage disposals have a reset button. It’s located on the bottom of your appliance and is red. Push in this reset button to get it working again.
- If this step doesn’t work, check the circuit breaker to see if it has tripped and, if so, push the lever back into the on position on your electric circuit box.
If you hear a humming sound, there is some hope. The humming indicates that your unit wants to work, but the blades might be stuck. Some object might be keeping your blade motor from turning. You can try dislodging this object so that the motor assembly is freed and turns freely. Your garbage disposal blades are fine, but you’re blade motor needs to turn freely so your garbage disposal blades can do their job. It might be a small piece of bone or similar very small object.
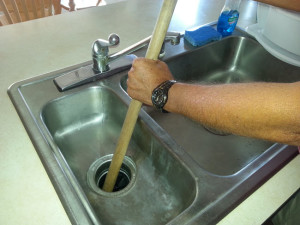
 You might try unsticking your blade motor. It’s easy and this works. Do you have a plunger in your house or an old broom handle? You need a piece of wood about this size in length and diameter. If you have a plunger with a wooden stick attached, this is perfect. Unscrew the stick from the rubber part of the plunger. Ensure that you have all power to your disposal turned off to ensure your safety. Just flip your circuit breaker switch to the off position. Apply hard pressure against one of you garbage disposal blades. Most garbage disposals have three blades. Push it until it moves.
This will dislodge the object that is preventing the motor from turning. Turn your electricity back on, hit your red reset button again, and you should be good to go. If not, repeat this procedure. Apply more pressure against your blades. You should feel the motor actually move. If this doesn’t work, you’re probably not applying direct pressure on your blades. Grab a flashlight and find your three blades. This will help you find your target and get the job done.
If none of these options get your garbage disposal working again, then the issue might lie with the fault switch of the disposal itself. If this is the case, you won’t hear any humming sound assuming you’ve pressed the red reset button under your garbage disposal. To fix this, follow these steps:
- Find the garbage disposal’s power switch. It is usually located either under the sink or on the wall next to the unit
- Go to the circuit breaker and cut off the power to the disposal
- Replace the switch that powers the disposal
- Go to the circuit breaker and turn the power back on.
Check to make sure that the disposal works. If not, you should call us. It is also important to note that, if you are unable to turn your disposal on and you cannot detect a humming sound coming from the unit, this means that it is probably beyond repair and will need to be replaced.
Quick Tips on Garbage Disposal Preventive Maintenance
Garbage disposals help make our lives easier, but it’s important that we take care of these appliances to keep them running at their best. The following usage tips will help you do a bit of preventative maintenance so that you can avoid some of the common problems that plague these units:
- Keep potato peels, eggshells, and coffee grounds out of your disposal. When these materials are pulverized, they create a paste that will accumulate and clog your drain.
- Grind up ice cubes and lemon peels in your disposal, about once or twice a month to keep it maintained.
- Pour a half-cup of vinegar and a couple of handfuls of baking soda down the disposal every month. It’s important to note that, when doing this, you must not turn the unit on. Let the mixture sit in the hopper until its finished foaming. Once this has occurred, rinse the mixture down the drain.
 As summer continues, the continued heat means you’re bathing more, watering plants, watering the grass, washing your cars and making gallons of iced beverages. The purpose of this article is to provide some easy ideas to help you reduce your water bill by following these simple tips.
Tips to Reduce Your Water Bill
Stop Leaks
Check all your faucets for leaks. A month of drips can add up to anywhere from 200-250 gallons of waste water. Also, be sure to check your toilet. The Environmental Protection Agency suggests putting a few drops of food coloring in the tank and waiting 15 minutes before flushing. If any food coloring appears in the bowl before flushing, you have a leak. Check your toilets as well! Look in the bowl after you flush. Make sure the water in the bowl is not moving. If it’s moving, the water is draining and you’re losing water! This is a relatively easy job for you to fix. Just make sure you fix it. This will help you reduce your water bill! If you need help, we’re here… just give us a call.
Tip: If you decide to invest in a new toilet, look for one with the EPA WaterSense label. They use at least 20% less water than a standard toilet. This will save a family of four $90/yr in reduced water utility bills.
Learn more about WaterSense HETs.
Shower Power
The EPA reports showering saves significant amounts of water. A bath tub can use 30 gallons or more, depending on the water depth. If you DO soak in the tub, use the bath water on your plants. Try to limit your showers to 5 minutes or less. Also, think about getting a water-efficient showerhead to save even more. And, look for those leaking shower heads!
Go Easy on the Dishwasher
Run the dishwasher only when it’s fully loaded and use the economy setting. Newer models run on different cycles, so check your manufacturer’s recommendations for the most efficient setting. Also, scrape dishes rather than rinsing them before placing them in the dishwasher.
Garbage Disposals: Cash Down the Drain
They can use as much as 4 gallons of water per minute! Consider disposing of food waste by composting or by wrapping it and placing it in the trash. Here’s some great tips that can help you keep your garbage disposal operating at peak proficiency. Do you peel potatoes? One of our customers has been peeling potatoes all summer and his drains kept clogging. Do not put the peels in your garbage disposal? And, never put coffee grinds or egg shells in your disposal!
Outdoor Water Use
It’s okay to let the soil dry out between watering your lawn. Water your vegetables and annuals as soon as they start to wilt. Perennials are tougher and only need water when they get droopy. Water during the cooler parts of the day to reduce evaporation. The EPA estimates that more than 50 percent of landscape water is lost due to evaporation, wind, or overwatering. If you water during the hot and humid part of day, as much as 30 percent of the water will be lost to evaporation alone.
Make sure your sprinkler is only watering plants and grass, not your sidewalk. Check hoses for leaks, and collect rainwater in barrels to water plants. The EPA suggests using soaker hoses because they use less water than sprinklers.
Another great idea is to use the water you might have sitting in the kids’ swimming pools. This is the water that you may have accumulated via rain, not the filtered chlorinated water associated with built in swimming pools.
In summary, using these simple tips will help you reduce your water bill. And, keep your eyes posted for other simple techniques. I saw a commercial on television that was both funny and informative. During a nice rainfall, a very intuitive family was using this as an opportunity to wash their cars. So, keep your eyes peeled for other ways to use free rain water to help you save on your water bills. As always, give us a call if you need help with any leaks you might have around your house or if you need any toilets replaced. We always recommend that you prepare a checklist of those little problems, like leaky faucets and toilets, and have our technician fix these problems on one service call. This will also save you money!
For more great tips on water usage and conservation, here’s a great article: Water Watch. Be sure to scroll down to the plumbing sections.


